Saturday, October 30, 2021

2020-21 Annual Progress Report

Johnstown, October 31, 2013, the day construction started.

Johnstown now


 Happy eight birthday to my layout! The layout has come a long way those eight years. Let's get down to the annual progress report.

I haven't done anything in terms of DCC conversion on the NS fleet. That's at the bottom of the priority list.  

As for track, almost all of the Pittsburgh staging area is laid down and ready for wiring. As I said last year, there's no ruch on this project due to the pandemic keeping me from holding operating sessions. But, the real heavy lifting is done.

Last year my goals were to finish painting and ballasting the track, make significant headway in Altoona and continue minor repairs. I'm happy to report all track is painted. All main lines are ballasted. The Altoona yard tracks have to wait until I can get over to Blue Ridge Hobbies for more ballast. 

I've made excellent progress in Altoona and have a game plan for finish it and the scenery as a whole. 

Altoona, currently under construction.

As for minor repairs, I'm addressing a fair amount of them. 

Goals for next year?

-Finish Altoona

-Wire up Pittsburgh Staging

-Wire up Altoona engine facility.

And that's really it. With the scenery done, it will finally be time to focus on operations.


Sunday, September 19, 2021

Started Building the Embankment and Mounting the Backdrops


 The title pretty much sums it up. I started things off by taking a long strip of white Styrofoam roughly 3/4 of an inch thick and two inches wide and beveling it with my hit knife. Next, I painted the whole thing raw umber and glued it along the backside of the Altoona peninsula with white glue.

Once the paint and glue dried, I broke out the lichen and started gluing down. At first, I tried using Elmer's spray adhesive. Turns out, this stuff isn't meant for Styrofoam. Oops! So after melting some of the embankment, I switched the white glue. 

With the lichen glued down, I moved on the the backdrop. I tried gluing one section to the wall, and it looked all wrong! The white edges of the foam core board stuck out like a bunch of soar thumbs. The solution was to painstakingly paint the edges with black acrylic paint. Once mounted, they looked awesome.

I'm pretty stoked about how the backdrop is turning out. I have about one more section to mount and that project is done.

Wednesday, September 15, 2021

Improved the First Train Show Building

This building is jazzed-up DPM Otto's Auto Parts. The seller added a base, interior LED light, signs and some roof details. A lot of the detailing is quite nice, but some of it had to go.

First and foremost, the styrene base was glued to a larger balsa wood base. The latter made a rather unconvincing. The first thing I did was pry the sucker off, remove the vehicles and toss it in the trash. 

Next, I pried off the plastic base and drilled a hole through the center for the light wire (the were regionally routed out the back wall). While the base was off, I re-glued the window inserts and drapes.

Not a bad little 30-minute project.

In other news I've started building the embankment along the back edge of the Altoona peninsula. More on that to come.
 

Saturday, September 11, 2021

Train Show Haul


 As threatened I went to a train show in Simpsonville, SC this morning. It was a small show, but there were some deals to be had. 

On the N Scale front, I was hunting urban buildings and managed to buy four nicely-detailed buildings. Some of the bases will have to come off and the modern cars have got to go. But otherwise, they're quite nice.

I also picked up five ore cars for my I1 to pull. They're quite elderly and as such are equipped with Rapido couplers and deep wheel flanges. The later will have to be replaced. The former I can live with as these cars will be run in a unit train that will pass from one staging yard to the other.


I also picked up a few things for my children's (really mine) O Gauge layout, the V&R Railroad. One vendor was selling a Lionel USRA 0-8-0 and a trio of freight cars for 60 bucks. That was smoking deal so I snapped that up. That is my son's Victor's train to run. 

I also scored a Lionel Percy for my daughter Rosie. They are both super excited to come upstairs and run the trains. That makes me happy. 

And what Lionel layout is complete without some of those cantankerous operating accessories? None! I snapped up this operating gateman.

Speaking of the V&R Railroad, it's lived on the carpet long enough. I'm planning to build a 5x8 table for all this stuff along with a kid-friendly control panel.


Friday, September 10, 2021

Why Didn't I Think of This Sooner?


 I've been moving forward with the Altoona end of the layout for better part of a month and a half now. Today, I had one of those eureka moments normally reserved for waking up at three AM or sitting on the toilet. 

As I've mentioned previously on this blog, my main concern with scenicing Altoona was said scenery hindering operation and getting damaged in the take. The solution to this concern is dead simple, make the middle of the peninsula a lift out!

With a lift out, we have functionality for operating sessions and nice scenery for show. Implementing this may be a tall order, but well worth the effort.

Monday, September 6, 2021

Train show tips


 I've decided to go ahead and attend the train show in Simpsonville this coming Saturday. It'll be the first show I've been to in the better part of two years. I've going to train shows since I was kid and I've even helped run a bunch with old club up in New York. I that spirit, I've decided to give you some of my tips and advice.

1. Have budget and stick to it.

2. Have an idea of what you want. For example, I'll be on the hunt for buildings and maybe some freight cars. Knowing what you want makes easier to stay on budget and avoid buyer's remorse.

3. Don't buy the first thing that catches your eye. Browse the whole show first. Yeah, you risk missing on that first thing but, if you do buy it, you risk missing out out on something may have wanted more.

4. The best merchandise is there at the beginning of the day, the deals happen at the end. This is an obvious trade off. All the good stuff is there at the start, but so are all eager buyers. At the end of the day, dealers are going to be tired, and more willing to make a deal so they don't have to lug the stuff home.

5. Do your homework. Say a dealer has that new engine you've been looking for. If you've checked several retailers before the show, you'll know if you're getting a good deal or not. Or, you can always use your phone to check the price. Do that discreetly, however.

6. If you're buying a locomotive, try before you buy. Most trains shows have a test track. If the dealer doesn't want you testing it, that's a big red flag.

7. Get business cards, flyers, and receipts. Maybe the dealer has an online shop. Also if your engine is a lemon, you'll want some recourse.

8. This is my most important piece of advice, Don't be afraid to leave empty handed. I get it, you got up early, drove a good distance and paid the admission only to not find what you're looking for. It sucks. The worst thing to do is buy something just to buy something. It's a sure-fire recipe for buyer's remorse. Sometimes the best train show deal is leaving with your money in pocket.

Wednesday, September 1, 2021

Started Mocking Up the Altoona Backdrop


 As mentioned previously, I ordered some urban photo backdrops off eBay (seller a.b.b.r_81 (link). What I got was a sheet with five two-foot long sections of generic urban building printed on sturdy paper. Ultimately this gives you a roughly 10-foot backdrop. Not bad for $32!

I started by rolling the section up the opposite way from which it came rolled. This allowed it to lay somewhat flat. Next I cut out the first section and mounted it to some foam core board with Elmer's spray adhesive. 

The next step was to painstakingly cut around each individual building with a razor blade. A good bit of work for sure, but nothing I can't handle. As of right now, the first section is temporarily in place with a bit of masking tape. 

At the moment, I'm not sure if I want the buildings at track level or raised up a bit with some kind of retaining wall. I do know I have to somehow fill the gap between the wall and the layout, a task I am dreading. We shall see.

Tuesday, August 31, 2021

Finished Blair Line's Green Door Lounge Kit


 Wow, more posts this month than all of 2020! Suffice to say, my enthusiasm is rekindled. Anyway, on to what I actually did.

Today's project was building Blair Line's Green Door Lounge kit. I thought this kit would look right at home by the Juanita Shop complex. I'm sure the guys who work there would appreciate a place to grab a few brews and let off steam after a hard day of keeping K4s and I1s on the rails.

I went with Floquil "Reefer White" on the walls, "Coach Green" on the windows and trim, and "Grimy black" on the roof. Assembly was a tad tedious but much easier that the Railroad Rooming House. 

One thing I love is the assortment of old-timey bill boards that come with this kit. I have a feeling a few of them may end up on some of my other buildings.

Now I need to scavenge some more buildings. There's train show coming up on the 11th. Perhaps I'll find some there. Although the Delta variant, I'm not sure I'll go.

Monday, August 30, 2021

Finished American Model Builders' Railroad Rooming House Kit


 My first structure kit in quite some time. As with other laser-cut wood kits, I painted everything prior to assembly. I went wit Tamiya "Linoleum Deck Brown"on the walls, Floquil "Reefer White on the doors, windows and trim, Floquil "Grimy Black" on the roof and Floquil "Caboose" on the chimneys.

As is typical for an AMB kit, assembly is a bit tedious. Each window contains three separate pieces. Truth be told, I left off the upper sashes on the back windows since they won't be visible. 

They way the paint turned out, I think the building doesn't really require additional weathering.

Thursday, August 26, 2021

The Hippo is Back


 I'm happy to report my Key Imports I1 is back in service. All it took was a new tender truck from Bachmann. As previously mentioned in this blog, I converted the tender pickup from drawing current from rail to both. Unfortunately one of the trucks fell apart. Replacement at about a fifteen-minute job. 

The locomotive was a bit herky-jerky on her test run. But, considering she sat for the better part of two years, that's to be expected.

A note about the real I1s class, they were nicknamed hippos by the PRR crews due to their girth. They were commonly used to haul iron ore to the steel mills of Pittsburgh and other heavy-haul trains.


Wednesday, August 25, 2021

Lighting fixes


 The other day, I noticed my streetlights in Johnstown were unusually dim. At first, I thought my low-voltage power supply had gone bad. However, after swapping it with a know good, that proved not to be the case. I ntoiced the PC board became hot within moments of current being applied.

I moved to the barrier strips that distribute power and noticed a small plume of smoke coming from one. Long story short, when my wife was stashing some of her stuff, she bashed to wires into each other, creating the short. This fix was dead simple. Now my N Scale motorists can stop treating the Busch traffic lights like a four-way stop!

Some more lighting in Gallitizin had glitched out on me. Namely a street light and the office light at the cement plant. The street light's wire had come loose, that simple fix. The office ultimatly required a new LED.

Unfortunately the Altoona end of the layout is pretty much dead in the water until all the stuff I ordered arrives. In addition to the structure kits, I've also ordered up a new urban backdrop from eBay. seller a.b.b.r_81 (link). More on this when it arrives.


Monday, August 23, 2021

Finished Ballasing the Mains


I'm proud to report every inch of main line track on this layout is ballasted. All that remains now is  the Altoona yard tracks and the tracks by roundhouse. Then I can kiss the ballast goodbye until the next layout. However, that will have to wait until I can get to the hobby shop.

In other news, the Pittsburgh Staging yard has gone from procrastination purgatory to almost finished. Five of the six tracks are glued down. To honest things weren't as smooth as I expected. I must have gotten a bad batch of rail joiners because I had more than a few that simply would not go onto the rail!

If you're wondering about the white blotch in the middle of the otherwise brown table top, well, the soldering iron had something to do with it. I used a bit of Dap patching Patch'n'Paint to fill the hole Talk about a bone headed move.


Sunday, August 22, 2021

Full Steam Ahead!


 Today was a productive day on the layout. First and foremost, I decided to try and return my I1 to service. It had stopped responding to the throttle and then one of it's tender trucks fell apart. I put it on the programing track, addressed the decoder and, when tested, the locomotive moved! Thank God! with ongoing chip shortage (damn pandemic) getting a replacement may be a tall (and not to mention costly) order.

After the I1, only my T1 and Alco FB remain out of service.


 Next on my list was ballasting. Now, all but about ten feet of main line are ballasted. That just leaves the yard and a few tracks in the Juniata Shop. That will have to wait until I get to the hobby shop.

Another project, painting the fascia burnt umber. It looks so much better in a neutral color.

 
I finally started laying track in the Pittsburgh staging yard. About damn time! The track is the old Atlas code 80 stuff.

 
Lastly, I added some turf to a small area near Altoona with some help from  Victor.

This is about all I can do until all the stuff I ordered arrives. I swear waiting is the hardest part. Didn't Tom Petty write a song to that effect?

Saturday, August 21, 2021

More Buildings for Altoona


     I stuck with my Altoona plan for a whole ten seconds. I was going to leave the whole area inside the Altoona loop undeveloped. Well, the more I thought about, I realized there were some structures I really wanted to include.   

    To wit, I have ordered up American Model Builders' "Railroad Rooming House" and Blair Lines "Green Door Lounge" kits. Both should lend a nice seedy, wrong-side-of-the-tracks vibe to the area. I've always wanted to include the former on a layout. Perhaps I'll add a few more structures and make a few blocks long area. I'll add a few businesses and a few houses.

    I've also realized I goofed when it comes to the mountains. The shops are south of the tracks and the city is to the north! Um, oops! I guess I'll need to hunt down some generic city backdrops. On that same note, I went ahead and moved Alto Tower to the north side of the tracks.

    Lastly, I thought the shop complex needed a power house. Thankfully, I had Model Power's "Coverall Paints" building sitting under my layout. This was salvaged off my last layout. I previously removed the base, painted it Floquil "Boxcar Red" and did the mortar effects. So all I had to do was pull off the "Coverall Paints" signs, plunk it on the layout and call it a day. Eventually I will add roads and parking areas.


Monday, July 26, 2021

Ballast and Backdrops

I managed to paint the backdrops last night. The project took all of about 10 minutes. I took some Apple Barrel "Holly Branch" green paint and mixed in black until I got the real dark green of distant mountains. Then I mixed up a darker batch for contrast. I slathered onto the wall with a big old paintbrush and that was that.

I've managed to ballast about half of the mainline tracks around the Altoona loop. The process seems to be going smoothly, so I can't complain.
 

For my last trick, I resoldered the feeder wire seen in the bottom right corner of the photo.

Sunday, July 25, 2021

The Altoona Endgame


 Hey everybody! I'm back and boy do I have a lot of excuses for all the tumbleweeds blowing through this once-active blog. Want to hear them? Well, I'll tell you anyway (I know I've used that joke before).

First off, for a good little while, my wife and I were seriously considering putting our house on the market. This would necessitate removal of the layout. And there's no point in working on it if you;re goning to tear it down. But, the good news is, we decided to stay put.

Also, as mentioned elsewhere in this blog, I was just getting kind of burnt out on the whole thing. Part of that was not knowing how to finish Altoona and having a lot of unpleasant items on the to-do list. And that, my friends is the subject of this entry.

My plan for Altoona is to finish the shop area, paint some backdrops on the wall, build a bit of mountain along the wall, add turf to the flat areas and call it done. I know, that sound like I taking the easy way out, but hear me out.

I'm building this layout for operation. That means operators in Altoona will be reaching over things and any building in the way stands a high risk of damage. Hence the minimalist approach.

In service of that goal, I painted the rails in the Altoona yard. Normally, rail painting is something I can only stand to do a little at a time. But today? Baby I was in the zone! I knocked it all out in a few hours. And let me tell you, it came down to the last few drops in my bottle Polyscale Rail Brown.

With that, every inch of track on this layout is painted save for the Altoona yard turnouts. I'm not going to bother. In the past, when I've painted them, no matter how careful I am about cleaning them and avoiding the contacts, it results in some very balky turnout operation. Looks may suffer but, I'll take reliability over aesthetics any day.

Now on to ballasting!

Friday, April 23, 2021

Leafing Through It


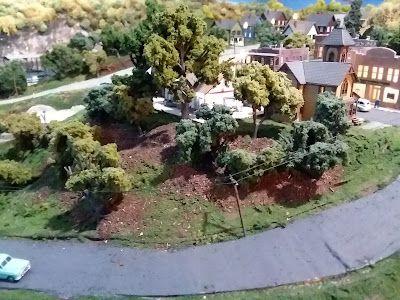
 I was running trains last night and I noticed some areas of the layout are starting to show their age a nd look a bit dusty, dull, and lifeless. One such area is around Gallitzin. I solution I learned from Bob Hayden is to simply apply more turf over the existing turf. However, the area I wanted to rejuvinate is a forest.

If you've ever been in a forest, you've no doubt noticed the floor is rarely green grass. I'd experimented in the past with using ground up leaves to mimic the look of fallen leaves, but I wasn't fully sold on it. But I decided to give it another try.

I must say the results are quite convincing, at least to my eye. The trick I find is to late some of the green turf bleed through. 

To make this stuff, I gathered fallen leaves from my maple tree, put them in the blender (please don't tell my wife) and let her rip. Once the leaves were chopped up fine enough, I put them through a strainer to ensure I used only the finest material. As of yet I haven't glues it to the layout but, I may do so in the future.

Another part of the project was cleaning up all the clump foliage my Woodland Scenics trees had shed over the years. Other trees were leaning quite badly and needed a few drops of CA to help them stand up straight.