Sunday, December 22, 2013
A Major Milestone Reached, The Benchwork is Done!
Well benchwork is finished. All in all I'd say this phase of the project went rather smoothly. The next step is covering the top with a layer of 2-inch thick styroafoam. Originally I had planned on going with four inches of foam. But at $32 per sheet, I realized that was going to cost me a whole lot of Benjamins. At any rate, that will probably happen in the new year.
Thursday, December 19, 2013
Finished Cornerstone's George Roberts Printing Kit
This Cornerstone kit is a nice, generic industrial building that should look right at home in central Pennsylvania. It took me nearly a week to get this thing put together, mostly because I've become much fussier about painting my buildings since the last layout.
I started off by painting the concrete parts of the walls Floquil "Concrete." Next I painted the brick sections Floquil "Boxcar Red," which makes a nice brick color. I painted the roof, water tower roof and supports and fire escape Floquil "Grimy Black." The water tank got painted Floquil "Roof Brown."
After all the paint thoroughly dried, I used poster paint to simulate brick mortar. Once all that was finally done, I actually put the kit together, hit it with a coat of weather wash applied the decals and sprayed on some Dulcote and called it done. I must say I'm really glad I took my time with the painting. The building came out awesome.
In other news, I finished some more benchwork.
I added the raised section over the "smurf door" and another six foot section along the wall. As you can see this is about as much as I can do until Cherokee is dismantled. Since I have a sneaking suspicion Santa is going to bring me some new motive power for Christmas, I still want to have a functioning layout for a little while longer. As such Cherokee gets a little stay of execution.
Monday, December 16, 2013
Major Benchwork Progress
After taking a break for Thanksgiving, I decided to get back to work on the benchwork. I actually built the narrow section along the wall shortly after the initial 4 x 8 section but just never got around to posting it. Yesterday I built the large peninsula in the center of the room. Nothing really to exciting to report here, just a whole lot of measuring, sawing, clamping, drilling and screwing.
The main challenge will be the back corner. As you can see, there is a small white door that leads into the attic space. There's no storage beyond it but it does allow access to the duct work and therefore must be able to open. That particular section of benchwork will be four inches higher than the rest and topped with a thin sheet of plywood. The rest of the layout will be topped with four inches of pink Styrofoam, so it should be seemless.
Now, I would have been well served to remember the old adage about measuring twice and cutting one. It turns out the room was a foot wider and a six inches longer than I first thought. So yay, a happy accident! My railroad empire is even more vast than first thought.
Also you can probably see I added some new track lights. These came from Lowes and are equipped with 60 watt GE Reveal bulbs. I prefer the Reveal bulbs as they show everything in their true colors.
I also decided it was time to go ahead and acquire a fire extinguisher. The one I selected is the dry chemical type. It's rated to put out A, B and C-class fires. An A fire is buring debris, like wood. A B fire is buring oil and chemicals and a C fire is electrical. All three types of fire can occur in train room so it's best to have an extinguisher intended for all three.
Monday, November 25, 2013
Another Trip to Pennsy Fantasy Land
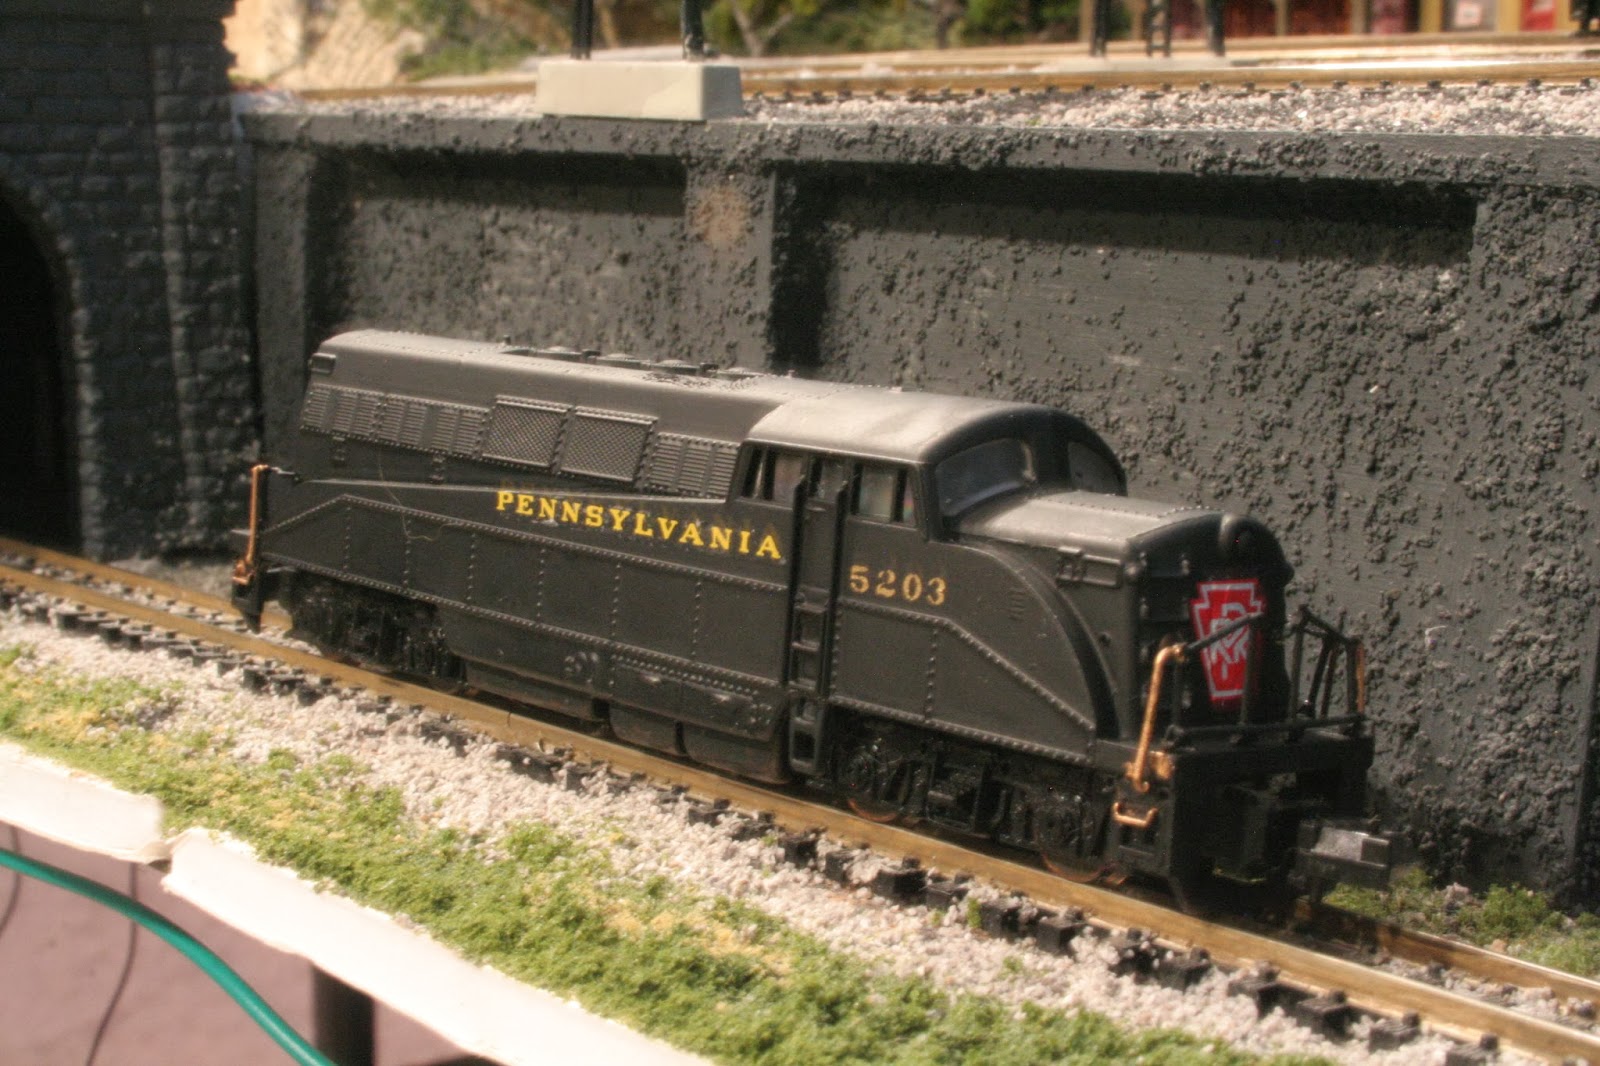
If you thought my last paint job got the rivet counters' shorts in a knot, this one will have them foaming at the mouth and going into palpitations. The Pennsy at least owned Alco FAs. The same cannot be said for the EMD BL2. But come on, it was only $20 at the local hobby shop.
Anyway, when I got the engine, it was unpainted black plastic. I gave it a quick coat of Floquil "PRR Brunswick Green" applied the decals (Microscale for the lettering and keystones, Woodland Scenics for the numbers), and painted the ends of the handrails Floquil "Bright Gold."
I have a few more motive power projects waiting in the wings. But as soon as turkey day passes, it's back to benchwork.
Anyway, when I got the engine, it was unpainted black plastic. I gave it a quick coat of Floquil "PRR Brunswick Green" applied the decals (Microscale for the lettering and keystones, Woodland Scenics for the numbers), and painted the ends of the handrails Floquil "Bright Gold."
I have a few more motive power projects waiting in the wings. But as soon as turkey day passes, it's back to benchwork.
Sunday, November 24, 2013
Meanwhile, Back at the Paint Shop...
With the holidays rapidly approaching, work on the layout is on hiatus for now. With that being the case, I've turned may attention back to painting locomotives.
I spent the better part of two weeks on re-painting and decaling this set of Lifelike Alco FA-1s. I started out by stripping off the the original paint and weathering with denatured alcohol. With the factory paint removed, I repainted the unit with Floquil "Tuscan Red." I know, the Pennsy never had a Tuscan red FA, but I thought it would look cool, so I went ahead with it.
I painted the truck side frames and fuel tank Floquil "Grimy Black." I also painted the back of the power pickups Floquil "Engine Black" to conceal their appearance.
The decals are from Microscale with the exception of the numbers. Those are Woodland Scenics dry transfers. Let me tell you, those stripe decals are a huge pain-in-the-ass to deal with. They're almost impossible to get straight. In fact, up close, this engine looks like it was painted by a bunch of drunks!
I finished things up with some Dulcote to seal the decals. The B Unit is still a work in progress, but its the same basic procedure there.
So all in all, not a bad project but definitly not my best work either.
I spent the better part of two weeks on re-painting and decaling this set of Lifelike Alco FA-1s. I started out by stripping off the the original paint and weathering with denatured alcohol. With the factory paint removed, I repainted the unit with Floquil "Tuscan Red." I know, the Pennsy never had a Tuscan red FA, but I thought it would look cool, so I went ahead with it.
I painted the truck side frames and fuel tank Floquil "Grimy Black." I also painted the back of the power pickups Floquil "Engine Black" to conceal their appearance.
The decals are from Microscale with the exception of the numbers. Those are Woodland Scenics dry transfers. Let me tell you, those stripe decals are a huge pain-in-the-ass to deal with. They're almost impossible to get straight. In fact, up close, this engine looks like it was painted by a bunch of drunks!
I finished things up with some Dulcote to seal the decals. The B Unit is still a work in progress, but its the same basic procedure there.
So all in all, not a bad project but definitly not my best work either.
Thursday, October 31, 2013
Layout construction begins
Well, the layout is officially under construction. I spent the better part of last weekend painting the walls of my rec room sky blue. Today I built the first 4x8 section of benchwork. I used 2x2s for the legs and 1x3s for the horizontal boards. The whole thing will be topped off with a layer of pink Styrofoam insulation. The layout will ultimately be 48 inches high, which is about waist height for me.
In other new, I've reconsidered my choice of track. When I first started planning this layout, I was excited to use Atlas's newer and nicer-looking Code 55 track (I used the old Code 80 stuff on my last layout). However, I've changed my mind and decided to go with Peco Code 55 instead. For one thing Peco's c55 track is really code 80 rail that's sunk into the ties. This not only makes it more robust but also allows me to run old engines from the deep-flange days with no modification.
Another point in favor of Peco is the turnouts are reputed to be of higher quality than Atlas. Of course I'm going by what I read on forums and other blogs. But what I have read seems to be pretty consistent. Also Peco simply overs a greater variety of turnouts that will greatly simply my track plan.
Now Peco isn't perfect. Being a British product, it's model of British prototype track. As such the ties are too far apart to accurately represent American track. But you know what? That's really a minor quibble when get right down to it. I would much rather have a reliability than accuracy.
In other new, I've reconsidered my choice of track. When I first started planning this layout, I was excited to use Atlas's newer and nicer-looking Code 55 track (I used the old Code 80 stuff on my last layout). However, I've changed my mind and decided to go with Peco Code 55 instead. For one thing Peco's c55 track is really code 80 rail that's sunk into the ties. This not only makes it more robust but also allows me to run old engines from the deep-flange days with no modification.
Another point in favor of Peco is the turnouts are reputed to be of higher quality than Atlas. Of course I'm going by what I read on forums and other blogs. But what I have read seems to be pretty consistent. Also Peco simply overs a greater variety of turnouts that will greatly simply my track plan.
Now Peco isn't perfect. Being a British product, it's model of British prototype track. As such the ties are too far apart to accurately represent American track. But you know what? That's really a minor quibble when get right down to it. I would much rather have a reliability than accuracy.
Thursday, October 10, 2013
Finished Model Power's Victorian House Kit
Wow, this kit was really hard to to put together. And I don;t mean hard difficult; I mean hard tedious. Being a Model Power kit I was expecting it to be simple, four walls and roof. The walls, window trim, cornices, railings and what not were all separate pieces! It took me well over week to put this thing together.
For the most part I left the building in its stock colors except the roof, which got painted Floquil "Grimy Black," the Cornices that got painted "Depot Buff" and the widnow trim that got "Antique White."
I started out by taking the walls and slathering on gray poster paint and then wiping off most of it. This fills in the mortar lines and gives one a very realistic brick look. From there on it was basically follow the instructions.
I weathered the building with a coat of dark weather wash followed up by a coat of Dulcote.
For the most part I left the building in its stock colors except the roof, which got painted Floquil "Grimy Black," the Cornices that got painted "Depot Buff" and the widnow trim that got "Antique White."
I started out by taking the walls and slathering on gray poster paint and then wiping off most of it. This fills in the mortar lines and gives one a very realistic brick look. From there on it was basically follow the instructions.
I weathered the building with a coat of dark weather wash followed up by a coat of Dulcote.
Subscribe to:
Posts (Atom)