Wednesday, January 11, 2017

Finished Tichy Train Group's "Signal Tower" and Cornerstone's "Steel Water Tank" kits


These are the two structures I  alluded to in my last post. The first is a Tichy Train Group Signal tower kit. I went with Floquil "Depot Buff" on the walls, "Tuscan Red" and just plain "Tuscan" on the windows. The roof is Floquil "Roof Brown," I know inspired choice. The foundation is Testors "Flat Light Aircraft Grey."

As of right now, I not entirely sure where this building is going. It will either be at Johnstown where the South Fork Branch diverges or at the east portals of the tunnels to stand in for MG tower. 


The second kit is Cornerstone's "Steel Water Tank." This was a fairly easy kit to put together. I used "Flat Light Aircraft Grey" for the base and Floquil "Grimy Black" for the rest. I hit the base with some weather wash, followed by chalk. For the tank itself, I limtied weathering to brown chalk along the rivet lines to simulate rust. The kit also came with three water columns. These were panted in the same color scheme. The tank and columns will be located in the Altoona shop.

Tuesday, January 10, 2017

The Cassandra Crossing

No, not the abortion starting Burt Lancaster and Ingrid Bergman, rather the crossing of the Little Conemaugh River at Cassandra PA. Anyway for this first post of 2017, I thought I share the progress on this project.

I stared out by using my hot knife to dig out the river bed. Next I used plaster-soaked paper towels to smooth out the banks. The bridge itself is one half a of a Monroe Models stone arch bridge kit.I painted it with some inexpensive grey acrylic paint. Then I added some Plastruc C Channels painted Floquil "Rust" to simulate the steel reinforcements the PRR added to it's stone bridges after WWII. The actual tunnel under the tracks is a PVC pipe coupling cut in half and painted black. I added a Plastruct Handrail to each side of the bridge and painted them Floquil "Grimy Black."

As for the river bed, I painted the whole thing raw umber to give it and earthy undercoat. Then I used all three sizes of Woodland Scenics Talus to create the rocky bottom and added some "Dead Fall" to simulated fallen trees and submerged logs. With that done, I used some WS field Grass to simulate reeds and bulrushes.

The step I'm currently on is adding water. This phase takes forever because it must be done in multiple layers. For water, I use Modpodge Super Gloss Medium. It's basically the same stuff as Woodland Scenics Realistic Water only it's cheap and readily obtainable at Wal Mart. Once the water is done, I will be adding turf to the banks.


In between coats of water, I've also been working on weathering rolling stock. Nothing too special to report here. I start out with an India Ink wash followed by a coat of Acrylic Matte Finish. Next come the chalks and then another coat of matte finish. All in all I think these cars turned out pretty good.

I've also been working on some structure projects but that's another post for another day.

Wednesday, December 14, 2016

Endless Summer?

One question I get asked from time to time is "why don't you build a winter layout?" Well that's a no brainer. Model railroading for many of us, myself included is kind of an escape from our daily lives. And since most of my model railroading activity occurs in the winter months, where even here in the Palmetto State, the world is a grey, bleak, depressing wasteland; why on Earth would I want to model it? Frankly, I'd much rather come upstairs, flip on the lights and see my favorite part of Pennsylvania on a summer day, and it's warm.

Also, part of the reason I chose this area to model was I spent many a happy hour railfanning there with my dad. And always during the summer. So the summer setting is definitely evocative of those memories.

Now that said, I did briefly toy with the idea of doing an autumn-themed layout with all the brightly colored foliage. However, that would've required making hundreds of different color puffball trees. I never would have made this amount of progress if I'd modeled the fall.


Tuesday, December 13, 2016

Progress at Cassandra


I've spent the past few nights plugging away at Cassandra and the Danager Coal mine. At the coal mine, I created the large rock outcroping by using Dap patching plaster. I've used it for most of the rocks on the layout. It has a nice long working time and as it dries, it cracks, not unlike real rocks. After it dried for a few days, I stained it with some inexpensive Wal Mart acrylic paints. I must say I think this one came out better than many of the others on the layout.

Once the rocks were finished, I added some lichen to the top of the hill and started turfing around the coal mine itself. I plan on using a lot of cinder ballast as ground cover in the area as well. 

As for the railfan overlook at Cassandra, I added a small relay box I acquired off eBay a few years ago and some more trees. I also ordered some more vehicles off eBay (seller chucktheprinter) and added one to the small parking area.

Unfortunately, I seem to have exhausted a lot of my scenery supplies. So I'll need to turn my attention to other things until I can replenish it. But that's the great thing about model railroading. Can't do scenery? Weather some rolling stock, or build a structure, or do some wiring (yuck). There's always something to do.

Wednesday, December 7, 2016

I'm not quite dead! Feeling a bit better actually...

Wow, well over a month since my last update. I hope you didn't think I wasn't coming back.  Simply stated, after finishing Gallitzin, I hadn't felt motivated to work on the layout. But, than I started chipping away at Casandra in fits and starts. So Here's what I've gotten done so far: I, I've gotten most of the earthworks built along the wall between Gallitzin and the conemagh river, Ballasted the tracks of the main line from Gallitzin to Cassandra and the Southfork Branch from the river up to the end of track. I've created rock outcrops and begun landscaping the Casandra and Southfork areas.


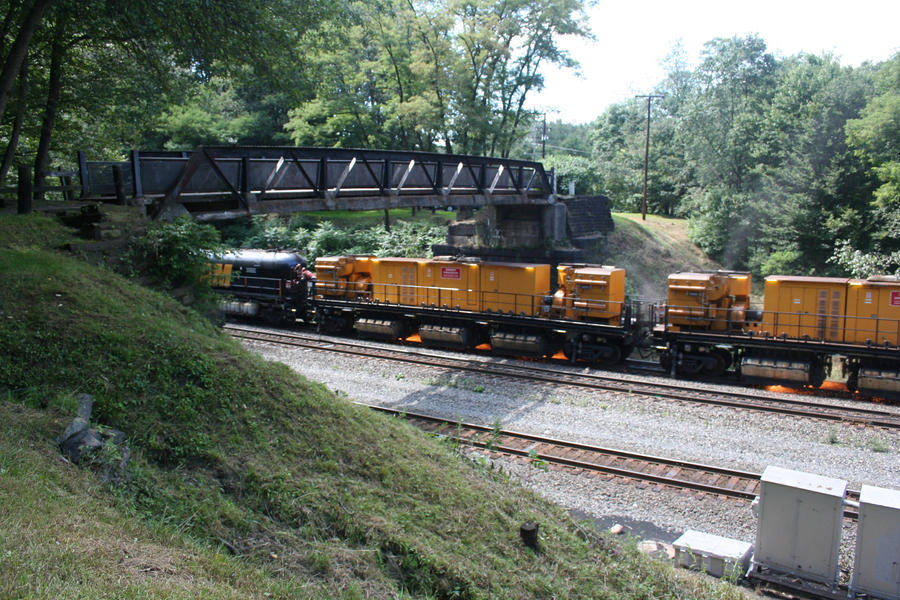
Cassandra doesn't offer much in the way of industry or operation but, it's one of my favorite railfanning spots and I had to include it on the layout. Here, the tracks come around a cure, downhill and pass under an old iron truss bridge before plunging into a rock cut. 
I built the iron bridge out of some Plastruct trusses and a bit of Model Power structure base. I glued the thing together and painted the trusses Floquil "Grimy Black." It will be mounted on a pair of Chooch Enterprises abutments. Right now it's only in place temporarily while other work is taking place.

I also went ahead and created the small railfan park. Check out the side by side comparison:

A Loram Rail Grinder passes through the real Cassndra, PA in August of 2010
And M1A 6720 thundering through the modeled Cassandra circa 1956

While the modeled scene isn't 100% accurate by any stretch of the imagination, it certainly captures the basic flavor. 


Meanwhile at Southfork, The track is ballasted and the groundcover applied. Also, the coal truck dump is finally in place of waiting patiently for two years. As you can see in the above photo, there is a gravel road running away from the truck dump. This goes to a small cabin on the Conemaugh River.

Monday, October 24, 2016

2015-16 Layout Progress Report

Well folks, it's that time of year again when I recap what I've done over the past year. Boy it's been a productive year too! Let's start with the basics.

Track: 100% complete

Wiring: All main lines and yards wired up and operational. Only four Industrial sidings remain to be wired along with part of the Altoona shop.

DCC Conversion: System Installation 100% complete, Fleet Conversion: PRR: 99% complete, Conrail Fleet 0%, NS: 80%.

The goal for last year was to complete Gallitizn. I managed to do all that and more. In fact I've moved into Cassandra and am making good progress there. I've also completed the crossing of the Conemaugh River.

Another goal I set for last year was to start working on the operating scheme for the railroad. Well, I still haven't made any progress on that front. At some point I will need to install a signal system, an expense I'm not looking forward to.

So let's talk goals for next year. My main area of focus will be the area from Cassandra to Johnstown. This leaves only the urban areas of Johnstown and Altoona to finish up. Whatever else I get done this year is gravy. And you know what? I'm in no hurry to get it done. While it's nice to start seeing an actual model railroad emerge from the swath of pink styrofoam, after finishing Gallitzin, I kind of felt like Ahab at the end of Moby Dick.

That bare styrofoam is a non-renewable resource and for me model railroading is very much about the journey more than the destination. There's still plenty to do after the scenery work is finished, like the aforementioned signal system and then serious detailing.  But what will I do when the layout's done? There's that old cliche about a layout never being done. I imagine I'll focus operating for a while. Once my kids get older, I may well end up sharing more of the space up there with them. Until then however, all aboard!

Saturday, October 1, 2016

Bachmann Ten-Wheeler Restoration: New Headlight

This has absolutely nothing to do with the layout, but since I need more materials before I can move on, I thought I'd share it. As you all know, I once had a garden railway and as such have lots of G Scale equipment. One loco is this Bachmann 4-6-0 lettered for the South Pacific Coast Railroad. I received it for my tenth birthday and, being a 10-year-old boy, I played rough with it. I dug her out of storage and she wasn't a pretty sight. So I decided a full restoration was in order.

Tonight, I started that restoration by replacing the headlight. The original filament bulb burned out decades ago. Seriously, I hasn't worked since Hootie and The Blowfish "I only wanna be with you" was in the top 40! Anyway, instead of another fillament bulb I opted for an LED. Here's how it went down:

The LED is a bright white 3mm with presoldered resister. These can be scored off eBay usually from Chinese seller for dirt cheap prices.

  
The headlight bezel needs a larger hole to accomodate the LED. Bother wires and the resister can fit through the existing hole in the top of the smoke box.
The wires from the headlight lead to a small switch on the back of the smoke box front. I clipped these wires about an inch or so from the end and stripped them. Then, I used a pair of alligator clips to temporarily connect these wires to the leads from the LED. Since polarity is crucial with LEDs, I applied power to the locomotive and made sure the headlight illuminated while the locomotive was running forward. With correct polarity determined, I spliced the wires, soldered them and covered the joints with Kapton tape. I reassembled the locomotive and called it done.


The headlight is quite bright, perhaps maybe too bright. But still, it's nice to see it lit once more. What's more, despite sitting in storage for nine years and having the crappy white plastic gears Bachmann used in all it's mid-1990s models, she still ran. She will need her gears greased and moving parts oild before I really run her for any length of time, but I think I'm on the right track.