Sunday, January 19, 2014

Finished Installing the Risers and Inclines

Well, I'm definitely married to this track plan now. Once I had the risers and inclines mocked up, I traced their outline with a sharpie and then glued them down. On my last layout, I used foam tack glue. This time around I used silicone caulk. Squeezing a tube of glue can be cumbersome and tough on your hands after a while. A caulking gun on the other hand is a lot quicker. I imagination I'll do the same on the road bed and track.

Once the glue had dried over night, I used plaster cloth (Another Woodland Scenics product) to cover the flex gaps in the riser and inclines. It was a messy job that took a good bit of time. But I;m finally ready for track.

Friday, January 17, 2014

Finished Mocking Up the Riser & Inclines


There are two ways to gain elevation on a model railroad. You can make risers and inclines out of plywood or you can do it the easy way and use these Woodland Scenics flexible styrofoam risers and inclines. As you can see, I chose the latter option. Why fart around with trying to calculate gradients and all that jazz? I prefer to let WS do the hard part. I used four sets of 2% inclines, which raise the track four inches over sixteen feet. I added another four sets of four inch risers. At any rate I pinned the risers to the layout base with some brads and traced their outline with a sharpie. The next project is to glue them down and cover them with plaster cloth. After that, we're finally ready for track.

Thursday, January 9, 2014

The I1s Project


Here's my completed model of a Pennsylvania Railroad Class I1s 2-10-0. This was one of the most involved kitbash projects I've ever undertaken. As mentioned previously on this blog, there's a huge dearth of Pennsy steam available in N Scale. In fact unless you want to spend a fortune on brass, your options are: the Minitrix K4 pacific, the Minitrix B6 0-6-0, the Minitrix 2-10-0 (which requires a good bit of kitbashing) the Bachmann 0-4-0 and the ultra rare Black River E6 Atlantic. Anyway, on to the blow-by-blow.

I started out with a Minitrix 2-10-0 (More about that locomotive here: [Link]). First I modified the hell out of the chassis so I could slide the shell backwards and make the steam pipes line up with the cylinders.
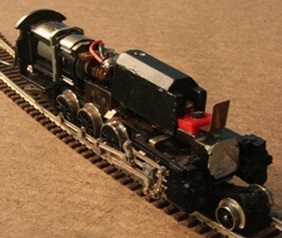
The modified Chassis and pilot truck.
Next, I cut the pilot off and added a piece of styrene between it and the rest of the shell. I made the two front air tanks from styrene rods, which I chucked in my electric drill and ground against a jeweler's file to get the rounded ends. The pipe connecting the tanks is actually a very short piece of wire.

I painted most of the shell Floquil "Brunswick Green," the cab roof Floquil "Tuscan" and the smokebox Floquil "Graphite." The tender shell was already painted in the correct colors as it was a leftover from another project.

I swapped the stock tender for a Bachmann USRA Medium-distance tender, which not only more closely matches the prototype, it also has 8-wheel pickup. A common malody among all three Mintirix steamers is poor power pickup and adding the 8-wheel pickup to the tender does wonders for their performance.

The "Pennsylvania" decals on the tender is from Microscale and the cab numbers are Woodland Scenics dry transfers.

After that was done, I sprayed the tender and engine shells with Testors Dulcote and used various shades of gray pastels for weathering.

All in all this project was intense. It took me about 2 months of working on and off to complete.

Addendum:

This locomotive has since been sold, ironically to finance the purchase of a brass I1. See you in about three years!

Saturday, January 4, 2014

The Table Top is Built


Oh man, what a day it's been. But it's been a good day. I managed to get the layout's tabletop built. I started out with a layer of 1/4" luan plywood screwed to the benchwork. I then topped it with 2" styrofoam insulation. Easy right? Wrong! See since my wife and I both have a 50-mile round trip commutes, fuel efficiancy was the main factor in us buying our cars, a Toyota Yaris and Corolla respectively. Both cars a great for saving gas but for hauling 4x8 sheets of plywood? Not so good.

Thankfully Home Depot had us covered and provided a rental flatbed truck. But Home Depot gave with one hand and took with other. See for some stupid reason, absolutely none of their stores in Spartanburg County carry 2" styrofoam. So my wife and I had to tromp all the way to Greenville to buy the stuff. Kind of annoying but not a lot I can do about it.

Once I got the stuff home I cut the plywood down to size with a jig saw and used a hot knife on the foam. The latter should definitely be done in the garage with the door open. The fumes from the pink stuff are quite nasty.

The origional plan was to simply go with 2 layers of 2" foam. That was before I found out it cost $32 a sheet. Needless to say after I tallied up what 12 sheets would cost, I picked my jaw up of the floor and rethought the whole plan.

The next step is to get some cork road bed and some risers and inclines from Woodland Scenics. At this rate I should be able to start laying track by the end of the month.

Sunday, December 22, 2013

A Major Milestone Reached, The Benchwork is Done!


Well benchwork is finished. All in all I'd say this phase of the project went rather smoothly. The next step is covering the top with a layer of 2-inch thick styroafoam. Originally I had planned on going with four inches of foam. But at $32 per sheet, I realized that was going to cost me a whole lot of Benjamins. At any rate, that will probably happen in the new year.

Thursday, December 19, 2013

Finished Cornerstone's George Roberts Printing Kit


This Cornerstone kit is a nice, generic industrial building that should look right at home in central Pennsylvania. It took me nearly a week to get this thing put together, mostly because I've become much fussier about painting my buildings since the last layout.

I started off by painting the concrete parts of the walls Floquil "Concrete." Next I painted the brick sections Floquil "Boxcar Red," which makes a nice brick color. I painted the roof, water tower roof and supports and fire escape Floquil "Grimy Black." The water tank got painted Floquil "Roof Brown."

After all the paint thoroughly dried, I used poster paint to simulate brick mortar. Once all that was finally done, I actually put the kit together, hit it with a coat of weather wash applied the decals and sprayed on some Dulcote and called it done. I must say I'm really glad I took my time with the painting. The building came out awesome.

In other news, I finished some more benchwork.


I added the raised section over the "smurf door" and another six foot section along the wall. As you can see this is about as much as I can do until Cherokee is dismantled. Since I have a sneaking suspicion Santa is going to bring me some new motive power for Christmas, I still want to have a functioning layout for a little while longer. As such Cherokee gets a little stay of execution.

Monday, December 16, 2013

Major Benchwork Progress


After taking a break for Thanksgiving, I decided to get back to work on the benchwork. I actually built the narrow section along the wall shortly after the initial 4 x 8 section but just never got around to posting it. Yesterday I built the large peninsula in the center of the room.  Nothing really to exciting to report here, just a whole lot of measuring, sawing, clamping, drilling  and screwing.

The main challenge will be the back corner. As you can see, there is a small white door that leads into the attic space. There's no storage beyond it but it does allow access to the duct work and therefore must be able to open. That particular section of benchwork will be four inches higher than the rest and topped with a thin sheet of plywood. The rest of the layout will be topped with four inches of pink Styrofoam, so it should be seemless.

Now, I would have been well served to remember the old adage about measuring twice and cutting one. It turns out the room was a foot wider and a six inches longer than I first thought. So yay, a happy accident! My railroad empire is even more vast than first thought.

Also you can probably see I added some new track lights. These came from Lowes and are equipped with 60 watt GE Reveal bulbs. I prefer the Reveal bulbs as they show everything in their true colors.

I also decided it was time to go ahead and acquire a fire extinguisher. The one I selected is the dry chemical type. It's rated to put out A, B and C-class fires. An A fire is buring debris, like wood. A B fire is buring oil and chemicals and a C fire is electrical. All three types of fire can occur in train room so it's best to have an extinguisher intended for all three.